Header Ads Widget

What is embedded system?


Embedded System

We are surrounded by embedded systems any where we go. Any electronic gadget you see around you or any electrical home appliance or machine that has option to take input from switches, push buttons, rotating knobs or sensors and providing output in any form like LCD display, LED indications or operating motor etc., contains a small embedded system in itself that is programmed for specific task that the system performs. Some examples are your coffee machine, smart watch, microwave oven, washing machine, refrigerator, music system, IoT (Internet of Things) devices etc. All of these devices contain an embedded computer on its circuit. So, what are embedded systems, what they contain or how they are build. 

The heart of an embedded system is a microcontroller or a small computer with an embedded software inside it, that decides how and what type of inputs it will take from outer world & how and what outputs it will deliver based on the embedded program inside it. We will further see what is microcontroller. Other components are power supply, input devices, output devices etc.  Before going deep into embedded system let us see basic of microcontroller and microprocessor. These are not same, there are differences. So, what is the difference between microprocessor and microcontroller. 
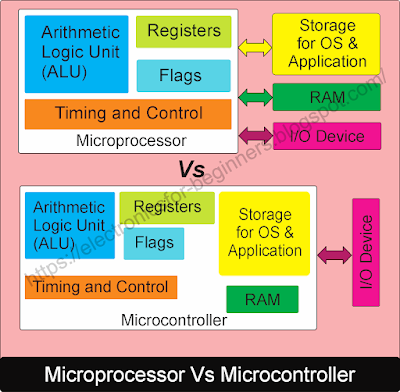
Microprocessor Vs Microcontroller

Lets us understand from this diagram which shows a microprocessor on top that has common parts ALU, timing and control circuit, registers and flags etc. ALU performs the processing of data reaching the processor, registers hold the data bytes temporarily and flags hold status in form of bits ('0' & '1') that decide some way the processor will operate. Timing and control part generate signals that help handshaking with surrounding devices like storage, RAM and I/O device. Storage for OS and application is outside processor and RAM for temporary storage is also outside processor. Simplest example is your PC (Personal Computer) or Laptop. It has a main mother board that contain processor and RAM and other supporting components. A hard disk is connected to mother board that contain the operating system to boot the device. And then what ever applications are installed on OS, can be executed as per user choice. But in case of a microcontroller the storage for OS & application and RAM, is within the processor chip, only I/O devices are to be connected externally and should be powered from external source. Hence OS and application are to be burnt inside the chip via programmer kit and software.

Here is the list of 10 differences between Microcontroller and Microprocessor. So, its clear that since an embedded controller uses a microcontroller, it will have all its operating system and application burnt inside the microcontroller chip itself. Hence it can run the inbuilt small application and perform defined task.

10 differences of Microprocessor and Microcontroller

There are multiple manufacturers who makes micro-controllers like Microchip, NXP, Renesas, Infineon, Texas etc. They range from 8 bit to 32 bit processing capability. This means we can have controllers which can process 8 bit of data at one time, similarly 16 bit and 32 bit processing capability. They are mostly RISC (Reduce Instruction Set Computer) based processors architecture that operate on small set of instruction to reduce load on small processors. 

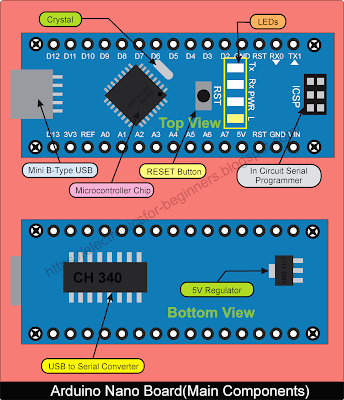
Most popular microcontroller board among startup hobbyist is Arduino, Raspberry Pi etc. Lets us see little more about Arduino board here as its very easy to program using Arduino IDE software. It uses a microcontroller MEGA328p (by Atmel Corporation) which is a 8 bit controller. This processor can be programmed via serial port over ICSP (In Circuit Serial Programming) pins. Means we can program the controller while it remain connected in the circuit with its peripheral components like switches, relay, LED etc. Arduino comes in different size formats like Arduino Uno, Arduino Mini and Arduino Nano etc. This board has an on board USB to serial converter chip which enable us to program directly via USB port, off course USB to serial converter chip driver should be installed on your system.

Here is the image of Arduino Nano board with its main components labelled for identification.

Arduino Nano main components

Micro-controller have in general below type of pins:

• Multiple input output pins called (I/O Pins) to connect sensors, relays, LEDs etc. These are basically digital I/O pins that means can have either state '0' or state '1' as programmed or given input. Pins marked as "D2, D3, D4.." etc are bidirectional I/O pins.
• There are some analog inputs pins also which can take analog input voltage from external source like sensor. Pins marked as "A0, A1, A2.." etc are Analog input pins.
• Reset pin to restart the microcontroller externally.
VCC and Gnd pin for providing power supply to run controller.
• Pins to connect crystal oscillator which provide clock signal. Some also have internal oscillator hence may not need to connect any external crystal oscillator.
• Programming pins which help to burn the code via serial port or USB port of PC. 

Program is written in high level language mostly C/C++/Python etc. and are then compiled, converted into binary format and then burnt into flash memory of microcontroller chip. Different IDE (Integrated Development Environment) are available for different family of microcontroller like AVR Studio for programming Atmel controllers, Arduino IDE is used for programming Arduino boards etc. Arduino being most easy to program for beginners as lots of free libraries are available and with simple codes we can write our codes, compile and burn on Arduino board to make an embedded system.

Here is a simple code which when burnt into an Arduino board, it make the onboard LED blink ON and OFF with a time delay of 1000 ms i.e. 1 Sec.


So, now the code is actually burnt on the MEGA328P microcontroller chip of Arduino board. Whenever the board is powered ON, it boots up and run this application which makes the LED to blink. Now if we want to change the blinking speed we do not have to make any hardware changes like changing capacitor or resistor values, simply change the time delay from 1000 to 500 or 2000 whatever is the rate required and burn the program again. Next time when the board is powered ON or restarts, the LED blinks at different speed.

This is a very basic program which every beginner learns while making first Arduino project and since the software is embedded in the chip here, this is an embedded system designed to perform a simple task to switch ON and switch OFF a LED

The syntax is very similar to C++ coding. The statements stating with '//' symbol are comment lines for our understanding, they are not compiled or executed.

Any Arduino code has two parts:

setup() - This part of code is executed once, when the board is powered ON.
loop() - Lines under this part are executed in loop forever till the board is getting power.

Similar to above example of blinking LED, we can interface switches as inputs, LCD and relays as output and so on and based on our system requirement, we can then make the flow of code and burn it to perform the desired task. If we want to run a different application, off course we cannot run it with existing application. We will have to change the application and the peripherals connected to it so that new expected task can be performed.

Click here to see more examples of embedded system.


Return to List of content                                                Return to DIY Project List

Post a Comment

0 Comments